Total Pageviews

Labels

Friday, 20 September 2019

Pattern - Mini Donuts

As a nice little accompaniment to my Donut Cushion Pattern I have designed these little mini donuts! You can use them for keyrings or bagcharms, make them into a necklace, or some bunting, or just have some dotted around the house for decoration. 

Lets face it, something as cute as these just have to be made even if they will serve no useful purpose! Add a face or keep them plain, up to you!


UK Terminology

Hook - 3.5mm

Yarn - Stylecraft Classique Cotton

Yarn A - 1 Ball of any colour of choice for the top of the donuts. For the donuts in the pictures I used (clockwise) Shell Pink, Wisteria, Tropical Jade (unfortunately discontinued)  Hot Pink and Sky Blue

Yarn B - 1 Ball of Wheat

Decoration - oddments of different colours of yarn, any colours of your choice

Face & Cheeks (optional) - oddments of black yarn for the eyes and mouth and Fucshia for the cheeks

Finished donut should measure 5cm (2 inches) across.


This mini donut is made in the amigurumi style, so it is worked a continuous spiral with no need to join at the end of each round. It may be helpful to use a stitch marker to mark the last stitch of each round, moving up to the next round as you work.

With yarn A, make 12 ch and join with a sl st in the first ch
Round 1 - 1 ch (does not count as st), 1 dc in each ch to end (12 sts)
Round 2 - *2 dc in first st, 1 dc in next st*, repeat * to * 6 times (18 sts)
Round 3 - *2 dc in first st, 1 dc in next 2 sts*, repeat * to * 6 times (24 sts)
Round 4 - *2 dc in first st, 1 dc in next 3 sts*, repeat * to * 6 times (30 sts)
Round 5 - *2 dc in first st, 1 dc in next 4 sts*, repeat * to * 6 times (36 sts)
Round 6 - 1 dc in each st to end (36 sts)

Change to Yarn B
Round 7 - Repeat Round 6 (36 sts)
Round 8 - *2 dctog, 1 dc in next 4 sts*, repeat * to * 6 times (30 sts)
Round 9 - *2 dctog, 1 dc in next 3 sts*, repeat * to * 6 times (24 sts)
Round 10 - *2 dctog, 1 dc in next 2 sts*, repeat * to * 6 times (18 sts)
Round 11 - *2 dctog, 1 dc in next st*, repeat * to * 6 times (12 sts)
Round 12 - Repeat Round 6 (12 sts)

Using a whip stitch and with the RS facing, sew together Round 1 and 12 to approximately a third of the way round.

Stuff the donut as much as you can using toy stuffing

Continue sewing and stuffing as you go along, when you finish, fasten off and sew in ends.


Sprinkles
Using different oddments of yarn in your choice of colours, sew random sprinkles over the coloured part of the donut. 
Depending on your preference you can embroider the sprinkles either before you sew and stuff or after. I find embroidering after is much easier and I have a picture tutorial on my blog to help, just click here to view!
Use the pictures as a guide and go nuts!

Face (optional)
Using the pictures as a guide, sew eyes, mouth and little rosy cheeks!


© All images belong to Kelly of lovedotty unless otherwise stated. Please link to pictures, content or DIY's if used on your own website. Crochet patterns are written by Kelly of lovedotty unless otherwise stated, please link to original post if used on your own website. Feel free to sell the finished product that has been created from the pattern, if sold via a website, please link to lovedotty blogspot. However please do not publish patterns in full or as your own, unless agreed by Kelly of lovedotty

Tutorial - Embroidering Pre-Stuffed Crochet

So for this tutorial we will be looking at embroidering onto crochet items post stuffing and sewing up. It is a much easier way of doing it and much better to sew onto the finished piece where you can see the size and positioning, than onto an item 'pre-stuffing' where you are not quite sure if it will end up exactly where you want! Because I am pretty useless at sewing (despite my desperation to be a sewing queen!) I have always struggled with this bit, so when I discovered this way of doing it was a relief!

For this tutorial I will be showing how I embroidered the sprinkles onto my mini donuts, however the principle is the same whatever you are embroidering and this will give the basic idea.

So here we go...
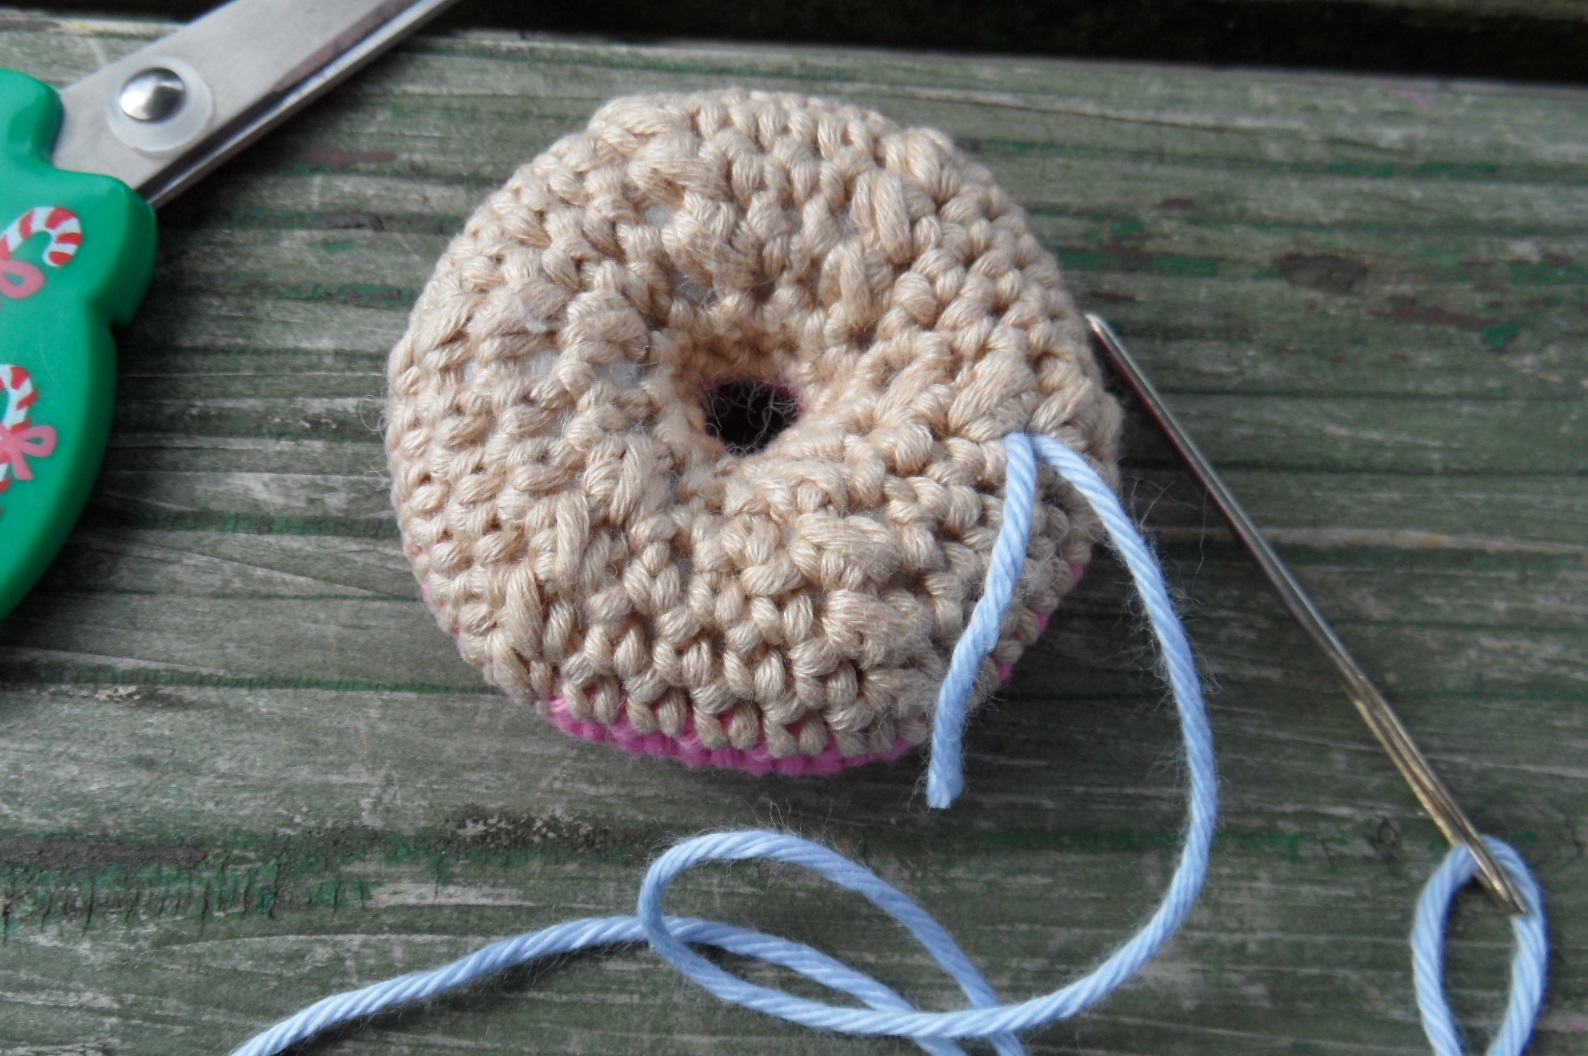
Cut a piece of yarn long enough to do all the embroidery required. So for my piece I am going to embroider blue sprinkles onto my pink mini donut..

Thread the yarn onto a wool needle. Decide where on the piece you will be beginning your embroidering and insert the needle into the bottom of the piece near to where you are beginning..

Pull the needle all the way through to the top of piece, coming out of the area where you will be beginning your embroidery..

Pull the yarn through until you leave a little tail on the bottom half, enough to be able to tie into a knot later. You will need to either secure this or hold it so it doesn't pull through when you begin your embroidery..

Begin working your embroidery as required. For my sprinkles, I made lots of random lines across the top of the donut..

When you have finished embroidering, on your last stitch, you need to insert the needle all the way through the piece and out of the same hole on the bottom you worked the first stitch into, where the tail should still be..

Pull the yarn through and your should be left with two ends of yarn poking out of the same hole..

Cut the yarn and then tie both pieces together into a knot and pull firmly to secure, keep an eye that you don't pull too tight in case it pulls at the embroidery you have just completed..

Cut the tails so you are just left with the knotted bit..

Using the end of your needle or a crochet hook, push the knot all the way inside of the piece until you cannot see it anymore..

Then, ta-dah! We are complete, you can't see any ends and no-one would even know!

Repeat as required, as I did with my finished donut!

I hope this made sense and you find it useful! If you fancy trying out your skills, you can use them on my FREE Mini Donut pattern on my blog!

Happy hooking!
Kelly@lovedotty


© All images belong to Kelly of lovedotty unless otherwise stated. Please link to pictures, content or DIY's if used on your own website. Crochet patterns are written by Kelly of lovedotty unless otherwise stated, please link to original post if used on your own website. Feel free to sell the finished product that has been created from the pattern, if sold via a website, please link to lovedotty blogspot. However please do not publish patterns in full or as your own, unless agreed by Kelly of lovedotty 

Saturday, 3 August 2019

Pattern - Puff Heart Granny Square

To celebrate Granny Square Day 2019 on 15th August, I have designed these quick and easy granny squares with a puff heart centre. I'm using mine as coasters or you can string them up as bunting to celebrate on the day!

If you aren't aware of Granny Square Day, the idea is on 15th August, we need as many people as possible to upload a picture of a crochet Granny Square to Instagram with the tag #GrannySquareDay2019 which then creates a virtual granny square blanket on your feed! 

For more info, visit @simplycrochetmag on Instagram!


Pattern in UK Terminology
Hook - 4mm
Yarn - Cotton DK, I used Stylecraft Classique Cotton in:
Sunflower
Soft Lime
Hot Pink
Azure

Please refer to the pictures as a guide to the colour combo's I used. For this pattern I will refer to the colour changes as Yarn A, B and C.
Special Stitches:-
puff - Puff Stitch, see stitch guide for definition if required.
In this pattern the puff stitch will be worked with 5 stitches
beg-puff - Beginning Puff Stitch, worked the same as a puff stitch with the first stitch consisting of 2 chains


With Yarn A make a magic loop

Round 1 - Working in the magic loop, beg-puff, 2ch, *puff, 2ch*, repeat from * to * twice more, sl st to top of beg puff to join (4 sts)

Round 2 - Sl st into next 2-ch sp, [beg-puff, 2ch, puff] in same sp, *1ch, [puff, 2ch, puff]* in next 2-ch sp, repeat from * to * twice more, 1ch, sl st to top of beg-puff to join (8 sts)

Round 3 - Sl st into next 2-ch sp, [beg-puff, 2ch, puff] in same sp, 1 ch, puff in next 1-ch sp, 1ch, *change to Yarn B (carry yarn A behind work), [3tr, 2ch, 3tr] in next 2-ch sp, 1 ch, change to Yarn A, puff in next sp, 1ch*, repeat from * to * [puff, 2ch, puff] in next 2-ch sp, 1ch, change to Yarn B, 3tr in next sp, 1ch, sl st to top of beg-puff to join (22 sts)

Fasten off Yarn A and carry on with Yarn B working in a traditional granny style

Round 4 - Sl st into next 2-ch sp, [3ch (counts as a st throughout pattern) 2tr, 2ch, 3tr] in 2-ch corner sp, continue to work *3tr in each 1-ch sp and [3tr, 2ch, 3tr] into each 2-ch corner sp of previous round*, sl st to top of beginning 3ch to join (48 sts)

Round 5 - Sl st into top of next 2tr of previous round and into 2-ch corner sp, [3ch, 2tr, 2ch, 3tr] in 2-ch corner sp and then repeat as per Round 4, from * to *, sl st to top of beginning 3ch to join (60 sts)

Fasten off Yarn B and join Yarn C to any 2-ch corner of Round 5

Round 6 - 1ch (does not count as st), work [1dc, 1ch, 1dc] into each corner sp and 1dc into each tr st of previous round, sl st into first dc to join (68 sts)

Fasten off and weave in ends
You can block the finished square if you wish but I found blocking wasn't essential. The squares in the picture aren't blocked
© All images belong to Kelly of lovedotty unless otherwise stated. Please link to pictures, content or DIY's if used on your own website. Crochet patterns are written by Kelly of lovedotty unless otherwise stated, please link to original post if used on your own website. Feel free to sell the finished product that has been created from the pattern, if sold via a website, please link to lovedotty blogspot. However please do not publish patterns in full or as your own, unless agreed by Kelly of lovedotty 


Friday, 8 March 2019

Pattern - Grace Mandala


With the beautiful early spring weather we had recently I felt inspired to whip up a mandala inspired by the imminent arrival of pinks and flowers that I am so excited about!

I decided to name this mandala the 'Grace Mandala' which is after my lovely Grandma, who if she were still with us will be turning 100 this year.

So here it is, I hope you give it a go and I would love to see your own colour interpretations


Pattern in UK Terminology

Hook - 3.5mm

Yarn - Cotton DK, I used Stylecraft Classique Cotton in:
Yarn A - Sunflower
Yarn B - Soft Lime
Yarn C - Shell Pink
Yarn D - Hot Pink
Yarn E - Poppy

With Yarn A make a magic loop

Round 1 - Working in the magic loop, 1 ch (does not count as a st throughout pattern), 6 dc, join with a sl st into first dc (6 sts)
Round 2 - 3 ch (counts as a tr), 2 tr in same st, 3tr in each of next 5 sts, join with a sl st into 3rd ch of starting 3 ch (18 sts)
Round 3 - Sl st into next st (middle st of 3 tr group from previous row), 3 ch (counts as a tr), 4 tr in same st, *1 ch, sk 2 sts, 5 tr into next st*, repeat from * to * 4 times, 1 ch, join with a sl st into 3rd ch of starting 3 ch (30 sts)
Round 4 - 1 ch, *1 dc, 1 htr into next st, [1 tr, 1 ch , 1 tr] in next st (middle st of 5 tr group from previous round), 1 htr in next st, 1 dc in next st, sl st into 1 ch sp*, repeat from * to * into each 5 st group from previous round until end, join with a sl st into first dc (36 sts)

Fasten off and join Yarn B in any 1 ch sp between 2 trs of previous round

Round 5 - 1 ch, *2 dc, 3ch, sk 3 sts, 2 tr into 1 ch sp of Round 3 (where we made a sl st in Round 4), 3 ch*, repeat from * to * 5 times, join with a sl st into 1st dc of round (24 sts)

Fasten off and join Yarn C in any 3 ch sp of previous round

Round 6 - 3 ch (counts as a tr), 4 tr in same sp, 1 ch, *5 tr in next 3 ch sp, 1 ch*, repeat from * to * 10 times, join with sl st in 3rd ch of starting 3 ch (60 sts)
Round 7 - Repeat Row 4 (72 sts)

Fasten off and join Yarn B in any 1 ch sp between 2 trs of previous round

Round 8 - 1 ch, *2 dc, 2ch, sk 3 sts, [1 tr, 2 ch, 1 tr] into 1 ch sp of Round 6 (where we made a sl st in Round 7), 2 ch*, repeat from * to * 11 times, join with a sl st into 1st dc of round (48 sts)


Fasten off and join Yarn D into any 2 ch sp between 2 trs of previous round


Round 9 - 3 ch (counts as a tr), 6 tr into same sp, 2 ch, *sk [1 tr, 2 ch, 2 dc, 2 ch, 1 tr], 7 tr into next 2 ch sp between the 2 trs of previous round, 2 ch*, repeat from * to * 10 times, join with a sl st in 3rd ch of starting 3 ch (84 sts)
Round 10 - 1 ch, *1 dc, 1 htr into next st, 1 tr in next st, [1 tr, 1 ch, 1 tr] in next st (middle st of 7 tr group of previous round), 1 tr in next st, 1 htr in next st, 1 dc in next st, sl st into 1 ch sp*, repeat from * to * into each 7 st group from previous round until end, join with a sl into first dc (96 sts)

Fasten off and join Yarn B in any 1 ch sp between 2 trs of previous round


Round 11 -  1 ch, *2 dc, 3ch, sk 4 sts, 2 tr into 1 ch sp of Round 9 (where we made a sl st in Round 10), 3 ch*, repeat from * to * 11 times, join with a sl st into 1st dc of round (48 sts)


Fasten off and join Yarn E in any 3 ch sp of previous round


Round 12 - 3 ch (counts as a tr), 4 tr in same sp, 1 ch, *5 tr in next 3 ch sp, 1 ch*, repeat from * to * 22 times, join with sl st in 3rd ch of starting 3 ch (120 sts)
Round 13 - 1 ch, *1 dc, sk 1 st, 5 tr in next st (middle st of 5 tr group of previous round), sk 1 st, 1 dc in next st, sl st in 1ch sp from previous round*, repeat from * to * 23 times, join with a sl st into 1st dc of round (154 sts)

Fasten off and weave in ends


© All images belong to Kelly of lovedotty unless otherwise stated. Please link to pictures, content or DIY's if used on your own website. Crochet patterns are written by Kelly of lovedotty unless otherwise stated, please link to original post if used on your own website. Feel free to sell the finished product that has been created from the pattern, if sold via a website, please link to lovedotty blogspot. However please do not publish patterns in full or as your own, unless agreed by Kelly of lovedotty 

Friday, 1 February 2019

Pattern - Mini Bobble Hat (The Innocent Big Knit)

So one of my crochet resolutions for 2019 was to do more crafting for charity. Me and my mum are currently working on hats and bonding squares for premature babies with the ol' pointy sticks (more on that another time!).

Another project I have on the go is taking part in 'The Innocent Big Knit. Basically every winter they pop little wooly hats on their smoothie drinks and then donate 25p for every bottle sold to Age Concern UK. I thought this sounds fun and Age Concern is such a great cause. Not content though with using the patterns on their website (they have loads of lovely ones though, if you want to check them out here!), I thought I would design my own. Most of the patterns on the website are knit, with a few crochet, however I wanted to recreate the classic knitted bobble hat in a crochet style! This is also a great stashbuster project!

And here it is!
And here is how I did it..

Pattern in UK Terminology

Hook - 3.5mm
Yarn - Any DK Acrylic (For the pictures I used Stylecraft Special DK in Duck Egg, Lemon and Pale Rose)
Materials Required - Yarn Needle, Stitch Marker (optional)

Rim of Hat
Ch 5
Row 1 - 1 dc in second ch from hook and next 3 chs, turn (4 sts)
Row 2 - Ch 1 (does not count as st throughout pattern), 1 dc in bl of next 4 sts, turn
Row 3 - Ch 1, 1 dc in next 4 sts, turn
Row 4 to 24 - Repeat Rows 2 and 3, row 24 should finish with a repeat of Row 2

Turn and working down the long edge of the piece,
Row 25 - 1 ch, 1 dc in the end of each row of dc worked until end (24 sts)
Fasten and leave a long tail for sewing

Fold the piece and with WS facing sew together the 2 ends to create a ring.

Sew in ends and turn out so RS is facing

Body of Hat
The body of the hat is worked continually in the round without closing off each row. You may find the use of a stitch marker helpful

Join yarn to the back loop of any dc st from Row 25.
Round 1 - 1 ch, 1 dc in bl of each st till end (24 sts)
Attach stitch marker to last stitch if required and move up with each round made
Rounds 2 to 5 - Work 1 dc in each st around (24 sts)
Round 6 - *1 dctog in first 2 sts, 1 dc in each of next 4 sts*, repeat from * to * 3 times till end of round (20 sts)
Round 7 - *1 dctog in first 2 sts, 1 dc in each of next 3 sts*, repeat from * to * 3 times till end of round (16 sts)
Round 8 - *1 dctog in first 2 sts, 1 dc in each of next 2 sts*, repeat from * to * 3 times till end of round (12 sts)
Round 9 - *1 dctog in first 2 sts, 1 dc in each of next 1 sts, repeat from * to * 3 times till end of round (8 sts)
Fasten off  leaving a long tail and with this tail and a yarn needle, sew up the hole

Bobble

I made a bobble using two 12 mm crochet hooks held together. Wind the yarn around both until you have the desired thickness. 
With a long piece of matching yarn attach around the middle, between the 2 hooks. Slip the wound yarn off the hooks, tighten the fastening yarn and trim the edges. Using the two sides of the fastening yarn, sew into the top of the hat.
Sew in ends.


© All images belong to Kelly of lovedotty unless otherwise stated. Please link to pictures, content or DIY's if used on your own website. Crochet patterns are written by Kelly of lovedotty unless otherwise stated, please link to original post if used on your own website. Feel free to sell the finished product that has been created from the pattern, if sold via a website, please link to lovedotty blogspot. However please do not publish patterns in full or as your own, unless agreed by Kelly of lovedotty