Total Pageviews

Labels

Showing posts with label Blog Posts. Show all posts

Wednesday, 29 January 2020

Advent Yarn Project!

One of the things I was very excited about in the run up to Christmas 2019 was my advent yarn that I had purchased from Siobhan's Crafts! I've never had anything other than the usual choccy calendar, but I thought I was going to treat myself to something a little bit different! I had bought Siobhan's gorgeous hand dyed yarn before so when I saw she would be doing a 'mermaid and unicorn' themed yarn for this years advent yarn I couldn't wait. This was going to be a proper treat for me and quite frankly I ruddy deserved it!

So the box arrived in October which meant plenty of time to drive me mad while I wait to open them!


All the little packages were so prettily wrapped in their unicorn and mermaid paper so I strung them all up so we could look at them with excited faces until the 1st December.


By 'we', I meant me and the boy, my husband was strangely unexcited! He was even more unimpressed that I ate his chocolate advent calendar, but that is another story for another time! The dog was also excited but only because wrapping paper is currently one of his favourite meals.

So when it came to actually opening the packages, they really didn't disappoint and my son had the genuis idea to pin them back up once opened so we could admire them.


He is a protege in the making that one!


So what was I going to do with the yarn exactly?
For a yarn addict this really isn't important but I had a few ideas. I had originally planned to crochet something with them each day in the run up to Christmas, probably some squares to make into a throw, bunting or Christmas tree skirt. To be honest nothing was decided and I was enjoying just looking at them so that was that.


So then Christmas was over and then I had a plan. I've really been enjoying corner to corner crochet recently. It is such a simple stitch and can show off variegated yarn so beautifully. so I thought the yarn would look perfect crocheted into little C2C squares so I gave one a go..


The yarn was so delicious to work with. although, to be fair, I still had no actual clue what to do at the end but carried on making as I was enjoying it so much, after all isn't that what crochet is all about!

There wasn't enough for a blanket, a tree skirt meant I couldn't use it for another year. Bunting? Hmm, nowhere really big enough in my house to display it all together and it would be a crime to split them up.

So after staring at a blank piece of wall, wondering how dull my house looks with all my lovely Christmas decorations put away I decided I would make the most awesome, bright, clashing and completely mad wall hanging.

So the plan was to make the 24 little C2C squares 8 by 8, then sew them together 8 by 3 which makes quite a sizable wall hanging. 

Here is a selection of the lovely little squares before I sewed them together..


I sent the husband off to look for a wooden dowel, put it all together and here we go!


I absolutely love it and it is such a talking point. I do love how you can create such unique pieces with crochet. And its it not like I ever thought I really need a brightly coloured wall hanging, it was just all organic off the back of 'what the heck can I do with these gorgeous mini skeins!'

So I am now looking forward to next Christmas's advent yarn offering, and in the meantime, I am going to order some skeins in my favourite colours, which at the moment is pretty much all of them!

If you want to view and order some of Siobhan's gorgeous yarns you can, via her website here

Happy Hooking!
Kelly@lovedotty


© All images belong to Kelly of lovedotty unless otherwise stated. Please link to pictures, content or DIY's if used on your own website. Crochet patterns are written by Kelly of lovedotty unless otherwise stated, please link to original post if used on your own website. Feel free to sell the finished product that has been created from the pattern, if sold via a website, please link to lovedotty blogspot. However please do not publish patterns in full or as your own, unless agreed by Kelly of lovedotty  

Friday, 3 August 2018

The Numberblock Blanket & Number 1!

So this is something I have been working on for the last couple of months and now it is finally complete and ready to share...


In case you are wondering what the heck it is, it is a 'Numberblock' blanket for my son's room. Numberblocks being from a show on cbeebies on the BBC.

It has been a massive project I have had on the go since about April and I finally finished it last month. I am very proud of the outcome and I know it looks a bit rubbish in places, because I am not great at the fiddly detailed stuff, but that just makes it even more unique, I guess!

To give you a background, my son is obsessed with numbers, it all started when he watched Numberblocks on cbeebies for the first time. He was hooked and everything had to be about numbers or 'Numberblocks'. So for those that don't know 'Numberblocks' is a cartoon about the lives of 10 sets of blocks who are all friends. These blocks are all made up of individual blocks making 1 to 10, all different colours, cute faces etc.. My son desperately wanted some Numberblock 'things' that he can play / interact with. Unfortunately the BBC hasn't cashed in on this yet, so he has had a variety of homemade plastic actual Numberblocks before he finally got a set of 'real' ones on the front of a magazine. He was over the moon, but I knew I could do better than that and as a crocheter, I thought I would make him something rather special, just like him!

First up a blanket! Luckily the Numberblocks are all squares that fit together so it was a no brainer, I could make a patch blanket. I used Lily Sugar 'n Cream which is a lovely aran weight yarn....


I wanted a nice sturdy blanket that would stand the abuse only a four year old can inflict! I needed nine different colours plus a background colour. I wanted the squares to be a flat colour, no gaps or lacy bits, so just crocheted round in tr stitch.

So I crocheted...

blocked...

 and sewed together...

Boom, that's the easy bit!

The tricky bit came with making the faces! I'm not great with fiddly crochet and I did struggle I must admit. It was very much a make it up as I went along, kinda of an unintentional first foray into free-form crochet! I used Scheepjes Catona (which is very much my go-to yarn of the moment!), this is 4 ply weight and worked great. Plus with my box of mini Catona's (see blog post Seeing Flowers) I had quite a pallet of colour choices!
Some faces I am chuffed with, others not so much, they look a bit startled (or bloodthirsty as my husband pointed out), but the boy is happy and so they are staying...


Good job really as I really don't fancy doing them again!

Next, I needed to jazz up the plain area of the blanket, so plumped for his name, numbers 1 to 10 and some stars. I completely winged it for the name and numbers but I think they look ok (ish).


For the stars, I used the mini star pattern which is available for free on my blog (Mini Stars)

Finally edged in leftover random colours using a dc stitch, which I think looks really effective...


So all done...

The aran cotton has made it a bit heavy and with this current ridiculously hot weather, my boy hasn't had a chance to really try it out with a good snuggle.

So the intention of the blanket was for his bed...


but has now been relegated to the end of his bed waiting for its moment!!


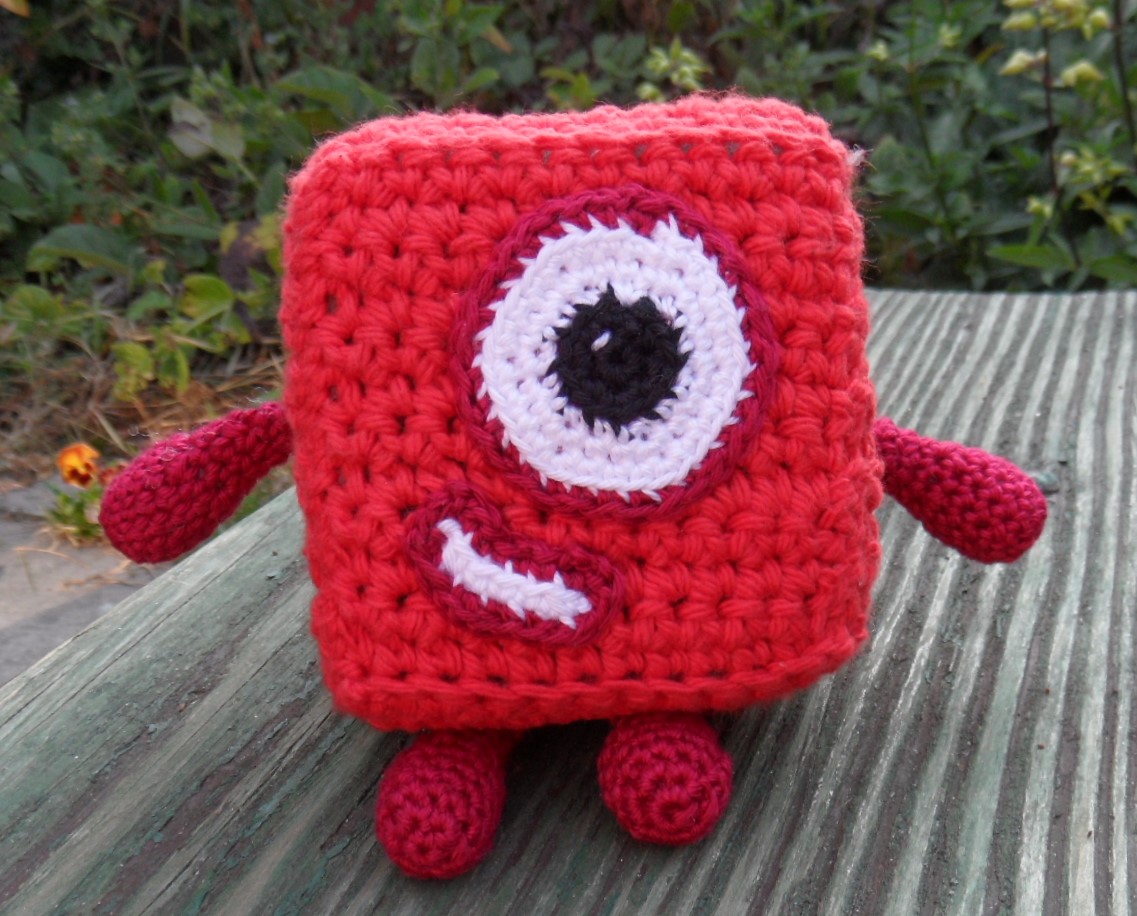
Next up, after my son mentioned that he didn't have a Numberblock toy he could cuddle in bed (oh he really knows how to melt my heart that one!) I made him a little 'Number 1' toy.

I still had some foam cubes left over from when I made my baby blocks (blog post Nursery Fun) so I covered one, again in Lily Sugar 'n Cream yarn in a DC stitch and then sewed them all together around the cube. Then I had to make another attempt at a realistic looking face with Scheepjes Catona, which I was actually quite pleased with this time, must be all the practice! And then little arms and legs, again in Catona in DC with a little bit of toy stuffing....


He is sooo cute...


However I should have known that my son is now asking when Number 2 to 10 will be arriving, 'will I get them for Christmas mum?' Hmmm, better get started....

So my son is very happy with his makes and I am relieved they are finally done. I actually had quite  a bit of yarn left over for which I will share 2 free patterns on my blog, one for a stripy shopping bag and the other for some quick and easy colour pop coasters. Both of these are great stash busters! Keep a look out!

Happy hooking!
Kelly@lovedotty

© All images belong to Kelly of lovedotty unless otherwise stated. Please link to pictures, content or DIY's if used on your own website. Crochet patterns are written by Kelly of lovedotty unless otherwise stated, please link to original post if used on your own website. Feel free to sell the finished product that has been created from the pattern, if sold via a website, please link to lovedotty blogspot. However please do not publish patterns in full or as your own, unless agreed by Kelly of lovedotty

Saturday, 30 June 2018

And another blanket! Geo-Squares!

A little delayed but here is a project I completed last year that I meant to share! Hot on the heels of my Vintage Patch blanket I started another. 2017 was definitely a vintage blanket year for me!

Cept for this one it wasn't for keeping unfortunately. The purpose, my brother was moving into a flat, and all family and friends whether they like it or not, get inflicted with a handmade crochet gift for such an event! And because I am the best sister, and the blanket was going to take sooo long, I made him this little cactus to keep him going..

Pattern (and kit) for this was from Simply Crochet magazine, sorry I forget which issue but it was last summer!!

I absolutely have a thing about clashing colours, in the right pattern it can look so effective and vibrant, the 'clashier' the better! And what better way to mix clashing colours in a simple geometric pattern offset with a muted grey. Makes it a bit more male friendly too! And another great thing about clashing colours is you can just attack your stash and use up all those odd colours you never though you would have a purpose for!

For the pattern I just used a simple treble crochet square, worked in rows, colour changing as you went along to create two diamonds. Colour changing projects can be so satisfying if you get it nice and neat. I made a stonking 120 of these and then sewed them together and edged with a simple treble stitch.

And tadah…

I think it looks really effective!


And it didn't even take that long, the simplicity of the pattern and variation of the colour change meant it was a really easy go-to project.


So yes my brother loved it and I struggled to let it go to be honest. I am definitely making another!

Happy Hooking!
Kelly@lovedotty

© All images belong to Kelly of lovedotty unless otherwise stated. Please link to pictures, content or DIY's if used on your own website. Crochet patterns are written by Kelly of lovedotty unless otherwise stated, please link to original post if used on your own website. Feel free to sell the finished product that has been created from the pattern, if sold via a website, please link to lovedotty blogspot. However please do not publish patterns in full or as your own, unless agreed by Kelly of lovedotty 


Thursday, 21 June 2018

Seeing Flowers!

I was a little spoilt for my recent birthday as I was given the Scheepjes Studio Pack, and in this is a box which contains all 109 different colours of Scheepjes Catona, in their little cutie pie 10g balls!


Amazingly this was gift was from my husband! Yes, the man who constantly tells me I have enough yarn, who fears his fate is succumbing under a mountain of the stuff when he opens the cupboard door. In addition to his yarn fears, he also glazes over whenever I am talking about yarn (which is quite a lot), so it really was a wonderful surprise!

Obviously yes I had been heavily hinting and leaving magazine pages open etc.. but hints don't really work with him, this is the man, who every year asks me on Christmas Eve what I want for the big day!

So anyway, yes he scored major brownie points and I was one happy bunny as you can see from this photo.

I even had to take a picture of my son with them for extra cuteness! And yes, I actually let him hold them, although he had to wash his hands first..


So then the big question is, do I just leave the cutie pie yarn balls as they are and admire them or do we use them to make something!
For a couple of weeks or so, I chose the first, thinking I couldn't bear to 'spoil' them and wanted to be able to look at them whenever I needed cheering up. But on the other hand I was desperate to use them.
I love Scheepjes Catona anyway, it is one of my favourite yarns to work. I recently finished the Sophie's Universe Stool Cover which was designed by the fab Dedri Uys of Lookatwhatimade


The stool is a all made in Scheepjes Catona and a thoroughly enjoyable project. The kit to make this was also a present, this time for Christmas from my parents! I have been very lucky!

So yes in the end, the urge to try all these little colours and make something was greater than keeping them, and I also wanted to get a good feel for all the colours and see what would be my favourites for future projects.
So what shall I make, I thought? Well I love Catona and I love flowers, so decided I would make 109 flowers out of each colour of Catona!
I used my mini flower pattern (available on my blog) and a 3mm hook and set to work. The pattern on my blog advises a 4.5mm hook, but these were hooked with Stylecraft Classique Cotton which is a DK weight. The Catona's are a 4ply, so a bit more delicate.

And ta-dah...

I decided each 109 different coloured flower would have a different colour middle, so it was quite a production line in the end making sure each colour was only used once.


And of course my Studio Pack came in handy...


..as I could use the swatches and magnetic board to keep track of which colours I had used so far..


And the best bit? You don't actually use much of the Catona so they still sit in their little jackets looking yummy so I have the best of both worlds.


And the flowers? Well I played with them for a while...


...and then decided to make some wall art with them!

I had a wall I needed cheering up, so I bought a canvas which the husband painted blue, he is proving quite useful lately! And then the plan is to attach the flowers to it I some sort of pattern. Keep it simple to really show the colours off


Next bit was having a play and deciding how I was going to position them. I decided to very roughly colour group them an then arrange them in a pattern.


I eventually decided on a heart design, well, because I ♥ Catona!

To attach them to the canvas I was going to use a hot glue gun. Now I have a little phobia of glue guns, they scare me a little, not great for a serial crafter! So with the husband on hand for any glue type emergency I set to work. Of course I survived the experience and ended up with a lovely heart of flowers, and here it is....


Don't they look lovely!


Its strange as looking at it. doesn't feel like there are 109 flowers, but there deifnately are, my four year old counted them for me!!

So not only do I have a lovely piece of wall art, I also have my very own personalised colour card for when choosing my future Catona projects!

And I still have a box of 109 cutie pies to admire. I will plan another project at some point to use them, but I think I will enjoy these little bundles of joy for a little bit longer!

Happy hooking
Kelly@lovedotty

© All images belong to Kelly of lovedotty unless otherwise stated. Please link to pictures, content or DIY's if used on your own website. Crochet patterns are written by Kelly of lovedotty unless otherwise stated, please link to original post if used on your own website. Feel free to sell the finished product that has been created from the pattern, if sold via a website, please link to lovedotty blogspot. However please do not publish patterns in full or as your own, unless agreed by Kelly of lovedotty