Total Pageviews

Labels

Showing posts with label Patterns. Show all posts

Wednesday, 4 May 2022

Pattern - Anime Balls


'Gotta Catch 'Em All', my son loves his anime balls based on a popular yellow cartoon and gaming character! 

So I thought I would share the pattern here!

Pattern in UK Terminology. 

Hook - 4mm 


Yarn
4 ply Cotton in White, Black and any colour of your choice.
For the four balls in the picture, I used Scheepjes Catona in Candy Apple (516), Apple Green (389), Lemon (280), Yellow Gold (208) along with Snow White (106) and Jet Black (110). 
Of course you can use any colour you like and make them every colour of the rainbow if you wanted! 

Materials Required
Yarn Needle, stitch marker and small amount of toy stuffing

Pattern Notes
We will make the ball using the amigurumi method where you continue in the round without the requirement to complete at the end of each round. It is advisable to use a stitch marker, mark the first stitch of the round and move up as required. When the ball is almost complete you will stuff and then close.
The button will be made separately and sewn onto the ball. This will be made in standard rounds.

Ball
With chosen colour, make a magic loop

Round 1 - 1ch (does not count as stitch throughout), 6dc into loop [6 sts]

Round 2 - 2dc in each st [12 sts]

Round 3 - *1dc in next st, 2dc in next st, repeat from * 5 times [18 sts]

Round 4 - *1dc next 2 sts, 2dc in next st, repeat from * 5 times [24 sts]


Round 5 - *1 dc in next 3 sts, 2dc in next st, repeat from * 5 times [30 sts]

Round 6 - *1dc in next 4 sts, 2dc in next st, repeat from * 5 times [36 sts]

Rounds 7 to 9 - 1dc in each st [36 sts]


Fasten off yarn and change to Black

Rounds 10 and 11 - Repeat Round 7 [36 sts]


Fasten off Black and change to White

Rounds 12 to 14 - Repeat Round 7 [36 sts]


Round 15 - *1dctog over the next 2 sts, 1 dc in next 4 sts, repeat from * 5 times [30 sts]

Round 16*1dctog over the next 2 sts, 1 dc in next 3 sts, repeat from * 5 times [24 sts]

Round 17 - *1dctog over the next 2 sts, 1 dc in next 2 sts, repeat from * 5 times [18 sts]

Round 18*1dctog over the next 2 sts, 1 dc in next st, repeat from * 5 times [12 sts]

(add the stuffing)

Round 19 - *1dc2tog in next 2 sts, repeat from * 5 more times [6 sts]

Fasten off leaving a long tail, sew the tail through the top 6 sts to close.


Button
With white, make a magic loop

Round 1 - 1ch, 6dc into loop, join with ss in first dc. [6 sts]

Round 2 - 1ch, 2dc in each st, join with ss in first dc. [12 sts]

Fasten off White and join Black. The next Round will be worked into the Back Loops only.

Round 3 - 1ch, *1dc in next st, 2dc in next st, repeat from * 5 times, join with ss in first dc. [18 sts]


Fasten off leaving a long tail, position evenly over the Black Stripe around the ball and sew into place.


Happy Hooking
Kelly@lovedotty


© All images belong to Kelly of lovedotty unless otherwise stated. Please link to pictures, content or DIY's if used on your own website. Crochet patterns are written by Kelly of lovedotty unless otherwise stated, please link to original post if used on your own website. Feel free to sell the finished product that has been created from the pattern, if sold via a website, please link to lovedotty blogspot. However please do not publish patterns in full or as your own, unless agreed by Kelly of lovedotty

Friday, 11 March 2022

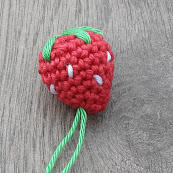
Pattern - Strawberry Fields


With Spring approaching I thought I would share my pattern for these little strawberries! 

I got quite addicted to making them last summer and with the weather a bit dreary I thought I would make some more! 

Pop them in a dish, turn into jewellery, decorate a wreath or make some bunting is just a few ideas of what you can do with them! 


Pattern in UK Terminology. 

Hook - 3mm 

Yarn
Small amounts of cotton 4ply in red, white and green. 
I used Scheepjes Catona in Candy Apple (516), Snow White (106) and Apple Green (389). 
Of course you can use any colour you like and make them every colour of the rainbow if you wanted! 

Materials Required
Yarn Needle, stitch marker and small amount of toy stuffing

Pattern Notes
We will make the strawberry using the amigurumi method where you continue in the round without the requirement to complete at the end of each round. It is advisable to use a stitch marker, mark the first stitch of the round and move up as required. When the berry is complete you will stuff and then embroider the white seeds and green leaves at the end. Included is a photo guide on this.

Berry
With red, make a magic loop

Round 1 - 1dc (does not count as stitch), 6dc into loop [6 sts]

Round 2 - 1 dc in each st [6 sts]

Round 3 - *1dc in next st, 2dc in next st, repeat from * twice more [9 sts]

Round 4 - *1dc next 2 sts, 2dc in next st, repeat from * twice more [12 sts]

Round 5 - *1 dc in next 3 sts, 2dc in next st, repeat from * twice more [15 sts]

Round 6 - *1dc in next 4 sts, 2dc in next st, repeat from * twice more [18 sts]

Round 7 - 1dc in each st [18 sts]

Round 8 - Repeat Round 7 [18 sts]

Round 9 - *1dc2tog in next 2 sts, 1 dc, repeat from * 5 more times [12 sts]

(add the stuffing)

Round 10 - *1dc2tog in next 2 sts, repeat from * 5 more times [6 sts]

Fasten off leaving a long tail, sew the tail through the top 6 sts to close.

White Seeds
Thread a piece of white yarn onto the yarn needle, roughly 30cm long
Using the following guide, sew around 10 to 12 (or as many as you like!) randomly placed dashes no more than a dc stitch long

Insert needle from bottom through into where you would like to make your first stitch, ensuring you do not pull the yarn all the way through and leaving enough of a tail to knot. Make first stitch no more that 1 dc stitch long and pull needle through to where you would like the next stitch to be made


Continue around until you are happy with the finish. On last stitch bring needle through to where we made the first stitch where the yarn tail still is. Bring yarn through and fasten off. Knot ends and then using the end of the needle or your crochet hook, poke the knot through into the berry until it is completely hidden


Green Leaves
These will be worked using the same embroidery method as the seeds. Thread a piece of green yarn onto the needle, roughly 60cm long. Work 5 leaves into the top of the strawberry, each made up of 3 stitches roughly 1cm to 1.5cm long

Inserting the needle from the bottom again, and leaving a tail as before, draw the needle up through the top of the berry. Make your 5 sets of leaves working from the middle of the top and back again


When making the last leaf, bring needle through to where we made the first stitch where the yarn tail still is. Pull this a little tightly which will help shape the berry. Finish as instructions for the white seeds. And we are done!


I hope you enjoyed making your strawberries! I would love to see what you use yours for! Please tag me on Instagram @lovedotty crochet


Happy Hooking!
Kelly@lovedotty


© All images belong to Kelly of lovedotty unless otherwise stated. Please link to pictures, content or DIY's if used on your own website. Crochet patterns are written by Kelly of lovedotty unless otherwise stated, please link to original post if used on your own website. Feel free to sell the finished product that has been created from the pattern, if sold via a website, please link to lovedotty blogspot. However please do not publish patterns in full or as your own, unless agreed by Kelly of lovedotty


Monday, 8 November 2021

Pattern - Merry & Bright Christmas Baubles


It's the most wonderful time of the year!! 

No, not actual Christmas but the couple of month's leading up to Christmas where you just get to do a load of Christmas crafts!

I have been busy squirrelling away on various crochet decorations and I would like to share one of my bauble patterns with you for these gorgeous bright and sparkly decorations!


Pattern in UK Terminology

Hook - 3.5mm

Yarn
Cotton DK in various colours. For the ones in the pictures I used yarn from my stash and varied between Sylecraft Special DK, Rico Ricorumi DK and Drops Muskat

Gold or Silver Lame, I used Rico Creative Lame

Materials Required
Plain Bauble measuring 19cm in circumference 
Yarn Needle

Pattern Notes
You will crochet two circles which will each cover 1 side of the bauble. The two pieces will then be sewn together around the bauble to join.


Bauble Cover - make 2

With lame, make a magic ring.

Round 1 - Ch3 (counts a st throughout), 11tr into ring, join with a sl st in top of beg ch-3 (12 sts)

Fasten off and join chosen colour between any 2 sts of previous round

Round 2 - Ch3, 1tr into same sp, 2tr in next sp, repeat from * to end, join with a sl st in top of beg ch-3 (24 sts)

Fasten off and join lame between any two 2-tr groups of previous round

Round 3 - Ch1 (does not count as st throughout), 2dc, ch1, *2dc in next sp between 2-tr groups, repeat from * to end,  join with a sl st in top of first dc (24 sts & 12 ch)

Fasten off and join chosen colour in any ch-1 sp of previous round

Round 4 Ch3, 2tr into same ch-1 sp, ch1, 3tr in next ch-1 sp, repeat from * to end, join with a sl st in top of beg ch-3 (36 sts & 12 ch)

Fasten off and join lame in any ch-1 sp of previous round

Round 5 - Ch1 (does not count as st), 3dc, ch2, *3dc in next ch-1 sp, repeat from * to end,  join with a sl st in top of first dc (36 sts & 24 ch)

Fasten off and join chosen colour in any ch-2 sp of previous round

Round 6 Ch3, 2tr into same ch-2 sp, 3tr in next ch-2 sp, repeat from * to end, join with a sl st in top of beg ch-3 (36 sts)

Fasten off and join lame in any st of previous round

Round 7 - Ch1, 1dc in each st around, join with a sl st in top of first dc (36 sts)

Make another circle, ensuring you leave a long tail at the end of round 7 on one of the pieces. Weave in all the other ends.

Making Up
Holding the two pieces together WS facing each other, with the long yarn tail and a yarn needle, sew them together by using whip stitch  through both sts on round 7.


Once you have joined about half way round, pop in the bauble and finished sewing around the bauble, ensuring it is in place.

Fasten off and weave in ends

And we are done!

Happy Hooking
Kelly@lovedotty


© All images belong to Kelly of lovedotty unless otherwise stated. Please link to pictures, content or DIY's if used on your own website. Crochet patterns are written by Kelly of lovedotty unless otherwise stated, please link to original post if used on your own website. Feel free to sell the finished product that has been created from the pattern, if sold via a website, please link to lovedotty blogspot. However please do not publish patterns in full or as your own, unless agreed by Kelly of lovedotty