Total Pageviews

Labels

Friday, 27 November 2015

Lovedotty's Handy Stitch & Abbreviation Guide


Please see a handy stitch and abbreviation guide to help you get your head around those crafty Crochet patterns! 

All in UK terminology with references to US where different.


blo - Back Loop Only
Working into the back loop only of the stitch in the previous row/round

ch(s) - Chain(s)

With a loop on the hook, yarn over hook, draw yarn through loop on hook (1 loop on hook). Continue as required

ch-sp(s) - Chain Space(s)
The space made when working a chain or chains between stitches

dc - Double Crochet (US - sc Single Crochet)
Hook into stitch, yarn over hook, draw hook back through the stitch (2 loops on hook),yarn over hook, pull yarn through both loops on hook

dc2tog - Double Crochet 2 Together (US - sc2tog Single Crochet 2 Together)
Hook into stitch, yarn over hook, draw hook back through the stitch (2 loops on hook), hook into next stitch, yarn over hook, draw hook back through the stitch (3 loops on hook), yarn over hook, pull yarn through all loops on hook

dc-spike - Spike Stitch using dc
Working the st into rows below the current row being worked (as defined by pattern), hook into stitch, yarn over hook, draw hook back through the stitch (2 loops on hook),yarn over hook, pull yarn through both loops on hook. 


dtr - Double Treble Crochet (US - tr Treble Crochet)
Yarn over hook twice, hook into stitch, yarn over hook, draw hook back through the stitch (4 loops on hook), yarn over hook, pull yarn through first 2 loops, yarn over hook, pull yarn through next 2 loops on yarn, yarn over hook, pull yarn through remaining 2 loops on hook.

dtr2tog - Double Treble 2 Together (US - tr2tog Treble 2 Together)
Yarn over hook twice, hook into stitch, yarn over hook, draw hook back through the stitch (4 loops on hook), yarn over hook, pull yarn through first 2 loops, yarn over hook, pull yarn through next 2 loops on yarn, yarn over hook twice, hook into next stitch, yarn over hook, draw hook back through the stitch (5 loops on hook) yarn over hook, pull yarn through first 2 loops on hook, yarn over hook, pull yarn through next 2 loops, yarn over hook and pull through the remaining stitches on hook

flo - Front Loops only
Working into the front loop only of the stitch in the previous row/round

htr - Half Treble Crochet (US - hdc Half Double Crochet)
Yarn over hook, hook into stitch, yarn over hook, draw hook back through the stitch (3 loops on hook), yarn over hook, pull through all 3 loops on hook.

htr2tog - Half Treble 2 Together (US - hdc2tog Half Double 2 Together)
Yarn over hook, hook into stitch, yarn over hook, draw hook back through the stitch (3 loops on hook), yarn over hook, hook into next stitch, yarn over hook, draw hook back through the stitch (5 loops on hook), pull through all loops on hook.

pc - Popcorn Stitch
Work required number (pattern usually specifies) of stitches into stitch below, remove hook and insert into the top of the first stitch of the group, insert hook into top of last stitch of group, yarn over hook, pull yarn through both stitches.

pf - Puff Stitch

Yarn over hook, hook into stitch, yarn over hook, draw hook back through stitch (3 loops on hook), repeat procedure into the same stitch for the required number of times, when complete, yarn over hook and pull through all loops on hook

RS - Right Side
Work with the front side of your project facing you

sl - Slip Stitch
Hook into stitch, yarn over hook, draw hook back through the stitch (2 loops on hook), draw last loop through first loop

sp(s) - Space(s)
The gap between stitches, whether directly between or made up of chains

st(s) - Stitch(es)
All variations of crochet are referred to as stitches

tr - Treble Crochet (US - dc Double Crochet)
Yarn over hook, hook into stitch, yarn over hook, draw hook back through the stitch (3 loops on hook), yarn over hook, pull yarn through first 2 loops, yarn over hook, pull yarn through remaining 2 loops on hook

tr2tog - Treble 2 Together (US - dc2tog Double Crochet 2 Together)
Yarn over hook, hook into stitch, yarn over hook, draw hook back through the stitch (3 loops on hook), yarn over hook, pull yarn through first 2 loops, yarn over hook, hook into next stitch, yarn over hook, draw hook back through the stitch (4 loops on hook), pull yarn through first 2 loops, yarn over hook and pull yarn through remaining loops on hook

trtr - Triple Treble Crochet
Yarn over hook three times, hook into stitch, yarn over hook, draw hook back through the stitch (5 loops on hook), yarn over hook, pull yarn through first 2 loops, yarn over hook, pull yarn through next 2 loops on yarn, yarn over hook, pull yarn through next 2 loops on hook, yarn over hook, pull yarn through remaining loops on hook

WS - Wrong Side
Work with the back side of your project facing you

Pattern - Mini Christmas Stars


Pattern in UK Terminology

Hook - 3mm

Yarn - DK Weight. I used Sirdar Ella, a lovely sparkly cotton blend yarn


Make a magic ring

Round 1 - 1 ch (does not count as st), 10 dc into round, join with a sl st into first dc (10 sts)
Round 2 - 4 ch, 1 dc into 2nd ch from hook, 1 htr into next chain, 1 tr into next ch, skip 1 st, sl st into next st (1 arm of star formed), repeat until end and you should have 5 arms, join with a sl st into first st of previous round
Fasten off and sew in ends.


© All images belong to Kelly of lovedotty unless otherwise stated. Please link to pictures, content or DIY's if used on your own website. Crochet patterns are written by Kelly of lovedotty unless otherwise stated, please link to original post if used on your own website. Feel free to sell the finished product that has been created from the pattern, if sold via a website, please link to lovedotty blogspot. However please do not publish patterns in full or as your own, unless agreed by Kelly of lovedotty

Saturday, 21 November 2015

Feeling Festive

Anyone who knows me, knows how excited I get about Christmas. Because I get so excited you would think with over 25 years crochet experience I would have oodles of Christmassy crochet goodies adorning my home. Sadly I do not, again, anyone who knows me, knows how seriously disorganised I am! I spend most Christmasses in a state of crochet panic, with about 50 ideas swirling around my head and can never quite organise myself to get them done. I must start a different make everyday and then get distracted by another pattern idea. Just when I start to get my flow I remember all the gifts I had planned to make and the fact that I 'have' to make them otherwise we will have nothing to hand over when we see certain friend or relative the next day (or in the next hour)!

This doesn't mean I don't have anything, I have the odd make that was lucky enough to get finished, and a few are them are here, snowflake garland, stockings, table mat and my beautiful wreath which I love!


So for Christmas 2015 I am really trying to get more organised. For starters, I managed to make the majority of my gifts back in October, way before I felt too Christmassy to get swept away. I think this is a good tip for anyone like me! Also as I have a shelf this year in the Norwich Gift Emporium so the incentive was there to get some makes finished, otherwise I would have nothing to sell!

When planning what to make to sell, obviously decorations are always the first thing to think of, but I wanted to do something different, so thought if I buy some large plain gift tags I could decorate with motif's, and so my Christmas Tree Gift Labels were created!

I have had a few compliments about these and I absolutely love them!
The trees are made from Stylecraft Special Cotton DK and the stars from Sirdar Ella (cotton DK weight)


I found the pattern for the tree on Pinterest (http://theroyalsisters.blogspot.com.au/2009/11/grandma-tree-tutorial.html), and it was really easy to hook. It was quite refreshing to find a pattern that actually worked up well and didn't need blocking. Using the cotton yarn, meant it was easy to stretch into shape and stay there.

The star pattern was really quick and easy, as follows: -
Using 3mm hook, make a magic ring
Round 1 - 1 ch (does not count as st), 10 dc into round, join with a sl st into first dc (10 sts)
Round 2 - 4 ch, 1 dc into 2nd ch from hook, 1 htr into next chain, 1 tr into next ch, skip 1 st, sl st into next st (1 arm of star formed), repeat until end and you should have 5 arms, join with a sl st into first st of previous round
Fasten off and sew in ends.

These little stars are fab, you can make them into anything, a garland, decorate a wreath, make Christmas cards or even just as they are, tie a gingham ribbon to them and hang them on the tree!

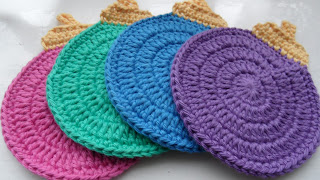
Another Christmas make of mine was these Christmas Bauble coasters (yes, it is me, always a coaster on the go!). Again really quick and easy to make and you will find the pattern here on my blog.

I made 2 types, some sparkly sets hooked in Sirdar Ella
And then some bold designs in Stylecraft Special Cotton DK.


As they are cotton, the are machine washable and should hold their shape. Perfect for coasters!

So, a week on Sunday I will be sending the husband up to the loft to get the decorations down ready to put up! So no doubt it will spark some more Christmas madness for me and once again the disorganisation will start. Thank god I started early!

Happy Hooking
Kelly@lovedotty

© All images belong to Kelly of lovedotty unless otherwise stated. Please link to pictures, content or DIY's if used on your own website. Crochet patterns are written by Kelly of lovedotty unless otherwise stated, please link to original post if used on your own website. Feel free to sell the finished product that has been created from the pattern, if sold via a website, please link to lovedotty blogspot. However please do not publish patterns in full or as your own, unless agreed by Kelly of lovedotty.

Saturday, 7 November 2015

Christmas Pattern - Bauble Coasters


Pattern in UK Terminology

Hook - 3.5mm

Yarn - Cotton DK Weight.

I used Sirdar Ella, a lovely sparkly cotton blend in shade 0012 Bombshell and 009 Very Lilly


With Yarn A, make a magic ring
Round 1 - 3 ch (counts as 1 tr throughout pattern), 14 tr into the ring, join with a sl st into the third ch of first st (15 sts)
Round 2 - 3 ch, 1 tr in same st, 2 tr into next st and each st until end, join with a sl st into the third ch of the first st (30 sts)
Round 3 - 3 ch, 1 tr in same st, *1 tr into next st, 2 tr into next st*, repeat from * to * until last st, 1 tr into last st, join with a sl st into the third ch of the first st (45 sts)
Round 4 - 3 ch, 1 tr in same st, *1 tr into each of the next 2 sts, 2 tr into next st*, repeat from * to * until last 2 sts, 1 tr into each of the last 2 sts, join with a sl st into the third ch of the first st (60 sts)
Change yarn
You will now be working in rows
Row 1 - 1 ch (does not count as st), 1 dc in same st and following 8 sts, turn (9 sts)
Row 2 - Repeat Row 1
Row 3 - 1 ch, 1 dc2tog (working into same st and next st), 1 dc into each of next 5 sts, 1 dc2tog (working into last 2 sts, turn (7 sts)
Row 4 - sl st into each of first 3 sts, 10 ch into next st and join with a sl st into the bottom of the same st, sl st into each of the remaining 3 sts
Fasten off and sew in ends
© All images belong to Kelly of lovedotty unless otherwise stated. Please link to pictures, content or DIY's if used on your own website. Crochet patterns are written by Kelly of lovedotty unless otherwise stated, please link to original post if used on your own website. Feel free to sell the finished product that has been created from the pattern, if sold via a website, please link to lovedotty blogspot. However please do not publish patterns in full or as your own, unless agreed by Kelly of lovedotty

Friday, 6 November 2015

Happy 1st Birthday!

I just thought I would post a mention that it is a year now since I started this blog. I am loving putting my crochet thoughts, patterns and makes onto the world wide web and am chuffed to bits so many people have taken time to read my posts!

Happy Birthday to me and thanks everyone for your support!

Kelly@lovedotty

Sunday, 25 October 2015

Pattern - Stripy Hot Water Bottle Cosy


Hook - 3.5mm

Yarn - DK Weight

I used Stylecraft Special DK in the following shades, White, Cloud Blue, Plum, Pale Rose, Meadow, Violet, Storm Blue, Parma Violet

The pattern was made up using random colours, therefore either feel free to follow the same approach or if you would like to use the same colours as me, I have listed the stripe order at the bottom of the pattern

This Hot Water Bottle Cosy is designed to fit a 1.5 lt hot water bottle

Front of Cosy
With Yarn, make 40 ch.
Row 1 - Work 1 tr into fourth chain from hook, work 1tr into next ch and each ch until end, turn (37 sts)
Change yarn
Row 2 - Work 3 ch (counts as 1 st throughout pattern), 1 tr into next st and each st until end, turn (37 sts)
Rows 3 to 29 - Repeat row 2, changing yarn for each new row
Fasten off

Back of Cosy
Using the yarn that you will eventually join the cosy together with (or Pale Rose in the picture), make 38 ch.
Row 1 - Work 1 dc into second chain from hook, work 1 dc into next ch and each ch until end, turn (37 sts)
Change yarn
Rows 2 to 24 - Repeat as Row 2 for Front of Cosy as above, changing yarn for each new row
Fasten off

Joining
Hold the 2 halves together with the wrong sides facing. The front of the cosy should be upside down and the back of the cosy should be the right way up. The top of the two sides of the cosy should be level with an extra 5 rows at the bottom on the front. 
Pin together.
With the front of the cosy facing count 10 stitches in from the top left hand corner. Join yarn through the top of both stitches.
The following round is worked through the stitches of both sides of the cosy, unless stated
Round 1 - 1 ch (does not count as stitch), dc in same stitch, 1 dc in next st, repeat until you reach the end of the top left hand corner. Work 1 dc into the corner and then carry on working dc sts down the left edge of the cosy
When you reach the part of the cosy which is at the bottom of the Back and 5 rows from the bottom of the Front, continue in dc along to bottom of the Front (should just be one piece of crochet with no joining), work 1 dc into each corner as before and continue round until you reach the bottom right hand corner of the Back, work dc sts again joining the front and back together.
When you reach the top right hand corner, work 1 dc into the corner and continue along the top for another 10 sts. 
Don't not fasten off yarn
Your cosy should now be joined with a hole at the top and an opening at the bottom with a flap at the front.

Neck of Cosy
With the same yarn and working into each side of the hole in a continuous round
Round 1 - 1 ch, 2 dc into first st, 1 dc into each of next 14 sts, 2 dc into next st (place a stitch marker in last st), 2 dc in next st, 1 dc into next 14 sts, 2 dc in last st, join with a sl st in first dc (36 sts)
In next row when you pass the stitch mark, move it up into the working row
Round 2 - 1 ch, 1 dc into same stitch and each st until end, join with a sl st into first dc (36 sts)
Round 3 - 1 ch, 2 dc into first st, 1 dc into each following st until you have reached the stitch marker, 2 dc into same st as stitch marker (move stitch marker into last st made), 2 dc in next st, 1 dc in each following st until last st, 2 dc in last st, join with a sl st into first dc (40 sts)
Join yarn B
In next row when you pass the stitch mark, move it up into the working row
Round 4 -  3 ch, 1 tr in next st and each following st until end, join with a sl st into the 3rd ch of starting 3 ch (40 sts)
Change yarn
Round 5 - 3 ch, 1 tr into same st, 1 tr into next st and each following st until you have reached the stitch marker, 2 tr into same st as stitch marker, (move stitch marker into last st made), 2tr into next st, 1 tr into each following st until the last st, 2 tr in last st, join with a sl st into the 3rd ch of starting 3 ch (44 sts)
Change yarn
Round 6 - Repeat Round 5 (48 sts)
Change yarn
In next row when you pass the stitch mark, move it up into working row
Round 7Repeat Round 4 (48 sts)
Change yarn
In next row when you pass the stitch mark, move it up into working row 
Round 8 - Repeat Round 2 (48 sts)
Round 9 - Repeat Round 3 (52 sts)
Round 10 - Repeat Round 2 (52 sts)
Change yarn
Round 11 - 1 ch, *1dc, 1 htr, 1 tr, 1 htr, * repeat from * to * until end, join with a sl st into first dc.
Fasten off

Flowers
With Yarn A make a magic ring and work first round into ring (alternatively you can make 2 chain and then work into the 2nd chain)
Round 1 - 1 ch (does not count as st), 10 dc, join with a sl st into first dc (10 sts)
Change to Yarn B
Round 2 - *2 ch, 2 tr into same st, 2 tr into next st, 2 ch, sl st into bottom of same st, sl st into next st*, repeat from * to * to end making 5 petals with the l
ast sl st being made in the first st of the round (30 sts)
Fasten off and sew in ends.

Making Up
Sew flowers onto the front of the cosy, using picture as a guide.
On the back of the cosy attach 3 buttons, ensuring that they will fit through the gaps between tr sts when the flap is closed, using picture as a guide


Stripe Order
Front of Cosy (Top to Bottom) - Storm Blue (SB), Parma Violet (PV), White (W), Pale Rose (PR), Cloud Blue (CB), Plum (P), PV, Meadow (M), W, PR, Violet (V), M, CB, W, P, SB, PR, V, PV, CB, PR, W, M, V, CB, P, PV, W, SB
Back of Cosy (Bottom to Top) - CB, V, W, M, P, PV, SB, W, CB, P, PR, M, PV, V, W, PR, SB, CB, P, M, W, SB, PV

© All images belong to Kelly of lovedotty unless otherwise stated. Please link to pictures, content or DIY's if used on your own website. Crochet patterns are written by Kelly of lovedotty unless otherwise stated, please link to original post if used on your own website. Feel free to sell the finished product that has been created from the pattern, if sold via a website, please link to lovedotty blogspot. However please do not publish patterns in full or as your own, unless agreed by Kelly of lovedotty

Thursday, 1 October 2015

That time of year!

I am so happy that Summer is over and Autumn has begun. I absolutely love this time of year, changing leaves, cooler weather, home comforts and a slow decline into Christmas. Don't get me wrong, its not that I dislike Summer, its just I'm not a fan of the heat, and lets face it Autumn is much better suited to curling up on an evening with your latest crochet project!

Like Spring, Autumn is a transitional month and brings so much inspiration to creative thoughts. My mind is always bursting this year with ideas of things to make. Which is quite handy considering I really need to start thinking of Christmas. I know it is really annoying when everyone starts going on about Christmas too early, but when you are a crafter it is necessary.

So I have some great ideas for Christmas crochet lovelies. Last year I made some lovely leaf design coasters which I gave as gifts, which were definitely inspired by the changes of Autumn.

I love making coasters so who knows, maybe some more coasters will find their way under the tree again this year!

As for decorations, last year I made this lovely wreath

I plan on sending the husband up into the loft soon to dig it out so I can write up a tutorial here on my blog if anyone is interested!

Anyway I think that is enough of Christmassy talk, too early to think about digging out decorations, lets enjoy Autumn while we can, so crisp morning walks, cosy makes, hot chocolate and curling up on the sofa for me. Lovely!

Happy hooking!
Kelly@lovedotty

© All images belong to Kelly of lovedotty unless otherwise stated. Please link to pictures, content or DIY's if used on your own website. Crochet patterns are written by Kelly of lovedotty unless otherwise stated, please link to original post if used on your own website. Feel free to sell the finished product that has been created from the pattern, if sold via a website, please link to lovedotty blogspot. However please do not publish patterns in full or as your own, unless agreed by Kelly of lovedotty. 

Saturday, 5 September 2015

The Granny Square Patch Blanket

Over the last couple of months I have been on a blanket journey. Not only did I complete my rainbow star stitch baby blanket but, as my lovely Facebook followers will know, I have also been making a granny square blanket for my sofa.

Why granny square? Granny squares are such a classic crochet design, I always advise it of being the best way to learn crochet and I have embarked on many 'granny' journeys over the years. I was taught to crochet when I was about 8 or 9 years old by my super talented mother and a giant granny square blanket was the first thing I ever made. Unfortunately I do not still have it as it was 'borrowed' on what transpired to be a permanent basis by my brother and has since passed down to my lovely nephews, which I do not mind at all! I do however, still have the second blanket I ever made and this was a granny square patch blanket.


It is a bit beaten, battered and faded (well it is over 25 years old!) but I still love it and use it. So remembering the joy of making and joining those little patches when I was a child gave me inspiration when planning my next blanket project. I had bought these lovely cushions for our sofa's, which did mean the purply blanket that adorned the large sofa no longer matched. Not having a throw on your sofa is not an option for a crochet addict so the planning began. First I had to choose a colour palette. So I went through my little box of yarn pegs and picked out colours to match the cushions in my staple 'go to' yarn of Stylecraft Special DK.


The colours I plumped for were Lime, Sunflower, Gold, Apricot, Raspberry, Sage, Petrol, Mocha and Parchment.

Next I needed to think of the style of granny square. I wanted to do something really simple that you could whip up quickly without thinking about and that didn't need blocking. So the design I decided on is the most basic granny I think you can get, using 3 different colours and every one finished in a round of Parchment.


The simple pattern is as follows: -
Using a 4.5mm hook with yarn A make a magic ring.

Round 1 - 3 chain (counts as 1 treble crochet throughout pattern), 11 treble crochet into the magic ring, join with a slip stitch into the 3rd chain of beginning 3 chain


Round 2 - slip stitch into the next gap between stitches, 3 chain, 2 treble crochet, 2 chain, 3 treble crochet into same space, *miss 3 stitches, 3 treble crochet, 2 chain, 3 treble crochet into next space*. Repeat from * to * twice more, slip stitch into 3rd chain of beginning 3 chain. This shapes the 4 corners of the square


Round 3 - Change to yarn B, slip stitch into top of next two stitches, slip stitch into next 2 chain space, 3 chain, 2 treble crochet, 2 chain, 3 treble crochet into same space, *3 treble crochet into next space (between corner stitches), 3 treble crochet, 2 chain, 3 treble crochet into next 2 chain corner space*, repeat from * to * twice more, 3 treble crochet into next space (between corner stitches), slip stitch into 3rd chain of
beginning 3 chain


Round 4 - Change to yarn C, repeat as per Round 3, working an extra 3 treble crochet on each side into the additional space between corners, slip stitch into 3rd chain of beginning 3 chain


Round 5 - Change to yarn D, repeat as per Round 4, working an extra 3 treble crochet on each side into the additional space between corners, slip stitch into 3rd chain of beginning 3 chain.

Fasten off and sew in ends


I decided the blanket would be 12 squares by 12 squares so I had a whopping 144 squares to be made


About 20 squares in, I felt there was something missing with the colour palette, there were more darker, richer colours but only a few pale shades, so I added Sherbert to the mix


In making the squares there was no pattern or plan, I just sat and changed colour randomly. This does mean there is a risk there will be more than one patch of the same, and I know there is at least 1 pair in there, but I have studied the finished blanket and I can't find it!


So once all the patches are complete, the next job is to join them together. The method I opted for was to crochet them together using a double crochet stitch and Parchment


My method for this is to crochet all the strips one way and then the other. Joining is probably my favourite part of blanket making as it is when you finally see your creation coming together. So the method to use for this is to hold 2 squares together, back to back, and then crochet them together along the top back loops of the final edge of both squares. Do not fasten off the yarn at the end, pick up the next two squares and continue crocheting.

So the next step after all 144 patches have been joined is to make the edging. For this I wanted to continue in the granny theme, so firstly I edged in double crochet in Parchment and then just used basic granny stitches for the next five rounds. 1 Parchment, then Lime, Parchment again, then Apricot and finally Parchment. For the first round of this (which is worked into double crochet) just miss 2 stitches between each 3 stitch cluster.

There is no particular design reason as to why I selected Lime and Apricot, they were the two yarns I had the most leftover! This is the beauty of these sorts of projects, you can use them as stash busters and a great way to use up yarn (so you can buy more!)


The final edging round was worked in treble crochet and slip stitches to give a fan effect. So to work this, you would use 1 treble crochet into the top of the first stitch in the 3 stitch cluster, 2 treble crochet into the second and 1 treble crochet into the third. Slip stitch into the space between the 3 stitch clusters and then repeat all the way round.


So with the patches joined and the edging complete, next is the unenviable task of sewing in the ends.


To be honest I don't actually mind this part at all, the key is to try and do as much during the project so you don't have much to do at the end, when you are itching to get it finished!

So that makes my blanket complete, and now for the Ta Da moment.......


 I love it, it has just the right mix of colour and has been an enjoyable project to complete


Also, because I had some yarn left over I made a cushion cover to match! I hope to share the pattern for this at some point, here on my blog


So, if you are wondering how the blanket and cushion look on my sofa with my bird cushions....


There we go! I am very happy with the result! So onto my next project, because I do have 2 sofa's in my living room you know......

Happy Hooking
Kelly@lovedotty

© All images belong to Kelly of lovedotty unless otherwise stated. Please link to pictures, content or DIY's if used on your own website. Crochet patterns are written by Kelly of lovedotty unless otherwise stated, please link to original post if used on your own website. Feel free to sell the finished product that has been created from the pattern, if sold via a website, please link to lovedotty blogspot. However please do not publish patterns in full or as your own, unless agreed by Kelly of lovedotty.

Saturday, 8 August 2015

Rainbow Baby Blanket & Hitting the 'Crochet Wall'

So as some of my lovely Facebook followers will know, I started a rainbow baby blanket journey probably about 3 months ago now. I got excited at the idea, bought the yarn, got more excited waiting for it to arrive, started it, excitement at exploding point and then......hit the crochet wall. My mind wandered, I was bored, I knew I had loads left to go and just was too impatient. So off I went and started several more projects instead (some of which are yet to be completed too!)

I am always a great advocate of finishing a project before starting the next one and only recently I was telling a crafty friend, who usually only does smaller projects, who was contemplating a throw to 'stick with it', 'don't give in, I know how impatient you are' and 'it will be worth it'. And there I was doing the exact same thing. It is not like I haven't experienced the long slog that goes into creating a crochet blanket, I have quite a lot in my back catalogue, but this is only a small baby one (he already has seven), which should usually not take very long, so I really don't know why I lost my flow. But I guess everyone hits that 'crochet wall' from time to time. Maybe because it had been a while since my last blanket (is a year a while?) or maybe it is because I am a mummy now so only have small windows of opportunity for hooking.

Whatever it was, I am past the worse hopefully! So here is the finished rainbow blanket for my little boy.

This was made with Stylecraft Special DK in Matador, Spice, Citron, Aspen, Turquiose and Plum. It has been made in beautiful star stitch which is one my favourites to crochet. I love the texture of the stitches and the neatness of the finished rows.


It was then edged in double crochet for 5 rows and using treble crochet and slip stitches created a fan effect for the final row.


My little boy is delighted with it, he likes to run his toy cars up the stripes and I am over the moon to have broke through the 'wall' and finished it!

So next, back to the other blanket I have started but not finished...... but maybe a few quick projects in between!

Happy Hooking!
Kelly@lovedotty

Sunday, 26 July 2015

Tutorial - Flower Wreath

This is my Flower Wreath that I whipped up this week. It is something I had been telling myself I was going to make for a while and finally got round to it. I am chuffed with the outcome, and would like to share the crafting process as follows!

Materials Required
Wicker Wreath (mine was roughly 30cm in diameter)
DK Cotton Yarn (I used Stylecraft Classique Cotton DK in White, Shell Pink, Sky Blue, Greek Blue and Fondant plus some lemon cotton yarn I had in my stash)
Glue
3/4 metre of Gingham Ribbon
Odds of ribbon (optional)

So to start, you need a medium sized wicker wreath.
I got mine from Hobbycraft, other craft shops may sell them, garden centres or online at Etsy or Amazon.

Next up is to make the crochet flowers. For this design, I used five colours and decided to use an ombre effect. For this pattern you will need 21 flowers in total, 4 of each in Shell Pink, Sky Blue, Greek Blue and Fondant and 5 in White along with some spare lemon yarn from my stash.

Here's how they are made....

1) With the lemon yarn, make a magic ring. If you are unfamiliar with this technique, I would describe it as going to make a knot but only pulling a loop through the hole, not the whole yarn. Please use the photo as a guide. If you prefer you can always make a 2 chain and then crochet into the second chain from the hook.


2) Work 1 chain (does not count as a stitch) and then work 10 double crochet into the ring. If you are using the magic ring technique then you would be crocheting over the additional yarn as per the picture.


3) Once you have worked the 10 double crochet into the ring hold the yarn tail and pull tight, closing the ring


4) To join, insert hook into first double crochet of round. Do not pull lemon yarn through, we are changing to Shell Pink and will join this colour without fastening off first.


5) With the Shell Pink yarn, hook onto the yarn


6) Pull the yarn through the stitch and then through the loop on the hook, leaving you with 1 loop on the hook in Shell Pink


7) Cut the lemon yarn and secure to the Shell Pink yarn at the back.


8) Pull tight and you have now changed colour and are ready to make the flower petals with the Shell Pink yarn


9) Work 2 chain, then 2 treble crochet into the same stitch below. In the next stitch work 2 treble crochet, 2 chain, slip stitch into same stitch below - now you have made the first petal into the first 2 stitches of the previous round


10) Slip stitch into the next stitch and repeat the pattern over the next 8 stitches of the previous round to the end until 5 petals have been made. Slip stitch into first double crochet of first round.
Fasten off and sew in ends

And now you have made your first flower!


Repeat pattern until all 21 flowers have been made.


Next arrange the flowers on the wreath giving an ombre effect. It is a good idea to make sure you have the flowers in the positions required before gluing rather than randomly gluing as you want to make sure it is even on both sides. Make sure you leave slight gaps between the flowers so you can still see the pretty wicker wreath underneath.
Once you are happy with the arrangement, glue the flowers into place. You can use a standard superglue or a hot glue gun, yarn is great in that it sticks to most things pretty easily! Totally optional, but I also glued some gingham bows in green and red (just because I love bows really!). Leave the glue to set overnight.

Once the glue has totally dried it is ready to be fixed to the wall and for this we use the gingham ribbon. Loop it around the top of the wreath, as follows...


Then tie a bow in the top to hook onto the wall


And then TA DA, the wreath is finished!

I hope you found this tutorial useful, if you are making this wreath, not only would I be chuffed to bits but I would always love to see pictures and hear your feedback.

Happy hooking
Kelly@lovedotty

© All images belong to Kelly of lovedotty unless otherwise stated. Please link to pictures, content or DIY's if used on your own website. Crochet patterns are written by Kelly of lovedotty unless otherwise stated, please link to original post if used on your own website. Feel free to sell the finished product that has been created from the pattern, if sold via a website, please link to lovedotty blogspot. However please do not publish patterns in full or as your own, unless agreed by Kelly of lovedotty.