Total Pageviews

Labels

Sunday, 26 July 2015

Tutorial - Flower Wreath

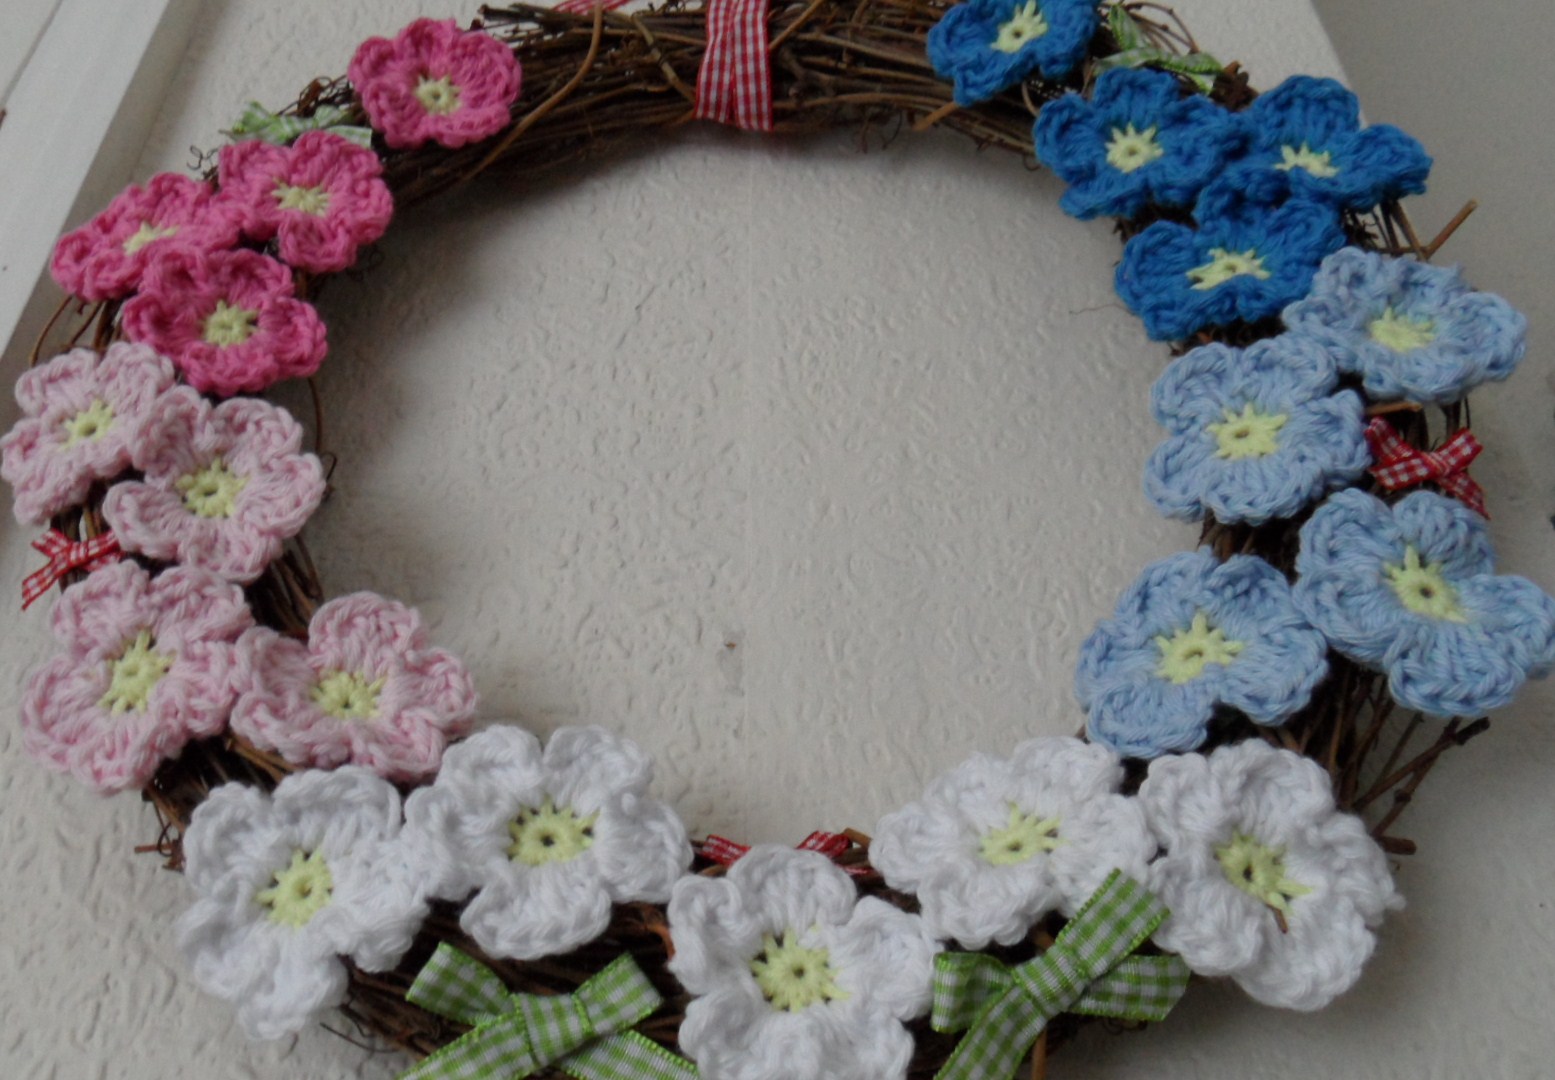
This is my Flower Wreath that I whipped up this week. It is something I had been telling myself I was going to make for a while and finally got round to it. I am chuffed with the outcome, and would like to share the crafting process as follows!

Materials Required
Wicker Wreath (mine was roughly 30cm in diameter)
DK Cotton Yarn (I used Stylecraft Classique Cotton DK in White, Shell Pink, Sky Blue, Greek Blue and Fondant plus some lemon cotton yarn I had in my stash)
Glue
3/4 metre of Gingham Ribbon
Odds of ribbon (optional)

So to start, you need a medium sized wicker wreath.
I got mine from Hobbycraft, other craft shops may sell them, garden centres or online at Etsy or Amazon.

Next up is to make the crochet flowers. For this design, I used five colours and decided to use an ombre effect. For this pattern you will need 21 flowers in total, 4 of each in Shell Pink, Sky Blue, Greek Blue and Fondant and 5 in White along with some spare lemon yarn from my stash.

Here's how they are made....

1) With the lemon yarn, make a magic ring. If you are unfamiliar with this technique, I would describe it as going to make a knot but only pulling a loop through the hole, not the whole yarn. Please use the photo as a guide. If you prefer you can always make a 2 chain and then crochet into the second chain from the hook.


2) Work 1 chain (does not count as a stitch) and then work 10 double crochet into the ring. If you are using the magic ring technique then you would be crocheting over the additional yarn as per the picture.


3) Once you have worked the 10 double crochet into the ring hold the yarn tail and pull tight, closing the ring


4) To join, insert hook into first double crochet of round. Do not pull lemon yarn through, we are changing to Shell Pink and will join this colour without fastening off first.


5) With the Shell Pink yarn, hook onto the yarn


6) Pull the yarn through the stitch and then through the loop on the hook, leaving you with 1 loop on the hook in Shell Pink


7) Cut the lemon yarn and secure to the Shell Pink yarn at the back.


8) Pull tight and you have now changed colour and are ready to make the flower petals with the Shell Pink yarn


9) Work 2 chain, then 2 treble crochet into the same stitch below. In the next stitch work 2 treble crochet, 2 chain, slip stitch into same stitch below - now you have made the first petal into the first 2 stitches of the previous round


10) Slip stitch into the next stitch and repeat the pattern over the next 8 stitches of the previous round to the end until 5 petals have been made. Slip stitch into first double crochet of first round.
Fasten off and sew in ends

And now you have made your first flower!


Repeat pattern until all 21 flowers have been made.


Next arrange the flowers on the wreath giving an ombre effect. It is a good idea to make sure you have the flowers in the positions required before gluing rather than randomly gluing as you want to make sure it is even on both sides. Make sure you leave slight gaps between the flowers so you can still see the pretty wicker wreath underneath.
Once you are happy with the arrangement, glue the flowers into place. You can use a standard superglue or a hot glue gun, yarn is great in that it sticks to most things pretty easily! Totally optional, but I also glued some gingham bows in green and red (just because I love bows really!). Leave the glue to set overnight.

Once the glue has totally dried it is ready to be fixed to the wall and for this we use the gingham ribbon. Loop it around the top of the wreath, as follows...


Then tie a bow in the top to hook onto the wall


And then TA DA, the wreath is finished!

I hope you found this tutorial useful, if you are making this wreath, not only would I be chuffed to bits but I would always love to see pictures and hear your feedback.

Happy hooking
Kelly@lovedotty

© All images belong to Kelly of lovedotty unless otherwise stated. Please link to pictures, content or DIY's if used on your own website. Crochet patterns are written by Kelly of lovedotty unless otherwise stated, please link to original post if used on your own website. Feel free to sell the finished product that has been created from the pattern, if sold via a website, please link to lovedotty blogspot. However please do not publish patterns in full or as your own, unless agreed by Kelly of lovedotty.


Monday, 29 June 2015

Pattern - Vintage Style Afternoon Tea Coasters


Pattern in UK Terminology

Hook - 3.5mm

Yarn - Cotton DK Weight (I used Stylecraft Cotton DK Classique)


With yarn A make a magic ring and work first round into ring (alternatively you can make 2 chain and then work into the 2nd chain)


Round 1 - 3 ch (count as 1 tr throughout pattern), 15 tr into ring, join with a sl st into 3rd ch of first st (16 sts)

Round 2 - 2 ch, 1 tr into next st (makes first tr2tog, which counts as 1 st), 1 ch, *1 tr2tog worked into same and next st, 1 ch* repeat from * to * 14 times, join with a sl into top of first tr2tog (16 sts)

Change to yarn B

Round 3 - sl st into first 1 ch sp, 1 ch (does not count as a st), *3 dc into 1 ch sp*, repeat from * to * 15 times, join with a sl st into first dc of round (48 sts)
Change to yarn C

Round 4 - 2 ch, 1 tr2tog worked into next 2 sts (makes first tr3tog, which counts as 1 st ), 1 ch, *1 tr3tog worked into same and next 2 sts, 1 ch*, repeat from * to *  22 times, join with a sl st in top of first tr3tog (24 sts)

Round 5 - sl st into first 1 ch sp, 3 ch, 2 tr into same 1 ch sp, *3 tr in next 1 ch sp*, repeat from * to * 22 times, join with a sl st into 3rd ch of 3 ch (72 sts)

Change to yarn B

Round 6 - 1 ch (does not count as a st), 1 dc in same st, 2 ch, *skip 1 st, 1 dc in next st, 2 ch*, repeat from * to * 34 times, join with sl st in top of first dc (36 sts)

Fasten off and sew in ends

You can chose to block the finished coaster, however they should be fine without.


For this pattern I used the 'Afternoon Tea' colour combination, using 'Soft Lime', 'Wisteria' and 'Ivory'

© All images belong to Kelly of lovedotty unless otherwise stated. Please link to pictures, content or DIY's if used on your own website. Crochet patterns are written by Kelly of lovedotty unless otherwise stated, please link to original post if used on your own website. Feel free to sell the finished product that has been created from the pattern, if sold via a website, please link to lovedotty blogspot. However please do not publish patterns in full or as your own, unless agreed by Kelly.

Wednesday, 27 May 2015

Is it blanket time again?

Lately I have been itching to make another blanket, I haven't made one in ages, well I say ages, is a year ages? Last blanket I started when I was pregnant, I had already made my baby about 8 baby blankets and decided I wanted to do a giant family blanket that we could all snuggle under. So I had an idea of doing a massive multi-coloured hexagon blanket:-


This was a great stash buster and what I loved about the project was there was no thinking about colour combinations you just went with the flow and if you picked up colours that traditionally didn't look great together, so what! They eventually blended into one another to make one big colourful mess! I loved every minute of making this blanket and now I love every minute of cosying under it!
Pattern was from 'Crochet at Home' by Brett Bara.

Being pregnant was great for crocheting, I didn't need an excuse to 'just put my feet up', everyone insisted on it, and as every crochet-addict knows, you cannot sit down for long without picking up a hook, no wonder I managed to make this massive blanket plus so much baby stuff!

Anyway back to my musings, I have decided I miss having a blanket project on the go, so decided I will make a granny patch blanket (everyone seems to be getting into the granny patch vibe at the moment so didn't want to feel left out). The idea is the finished product will look all lovely and yummy adorning my sofa. Currently I have a very purply blanket on my sofa which I made about 10 years ago and feel it is time for a change! Don't worry the purple one will find a new home, it is good to rotate!

So next I needed some colour inspiration. I decided I would like about 8 or 9 colours with one of them to be used as a background colour. Considering the blanket is to be for my sofa, it was a no brainer that I would use these gorgeous cushions I bought a few months back for my palette:-


I decided to use my trusty 'go to yarn' of Stylecraft Special DK which also meant I got to play with my sample pegs for the first time and I finally decided on the following mix:-


Lime, Saffron, Gold, Apricot, Raspberry, Sage, Petrol, Mocha and Parchment. I love these colours and combined they have such a lovely vintage feel to them. 


I think they have been matched pretty well to the cushions. I must confess I decided I needed a second pair of eyes, so my mum did help with the colour picking!

Really excited about starting this blanket, Now I just need to wait till payday so I can buy the yarn! Will keep you posted with my progress.

Happy hooking,
Kelly@lovedotty


Sunday, 10 May 2015

Etsy Page

I have just been tidying up my listings on my Etsy page, please pop over and have a look. They are all coasters on there at the moment, my cupcake, flower and vintage doily designs all in several different colour combinations!


I may branch out to other items one day but I blimin' love making coasters so much I have to try and sell some before they take over the house!
Of course the patterns for the flower and cupcake coasters are available for free here on my blog and the vintage doily style coaster pattern I hope to publish soon!
Happy hooking
Kelly@lovedotty

Sunday, 19 April 2015

Some of my inspirations!

I adore colour and since I am a rubbish artist this is probably why I love crochet as I can indulge this love into my form of artwork. I would have to say I find the majority of my colour inspiration from flowers. I adore flowers, I am always buying myself bunches for the house (note to husband!). They can have the most amazing colour combinations and just seeing them makes me want to hook some crochet. Most recently I have made these flower coasters which I wanted to make in the colour combinations of my favourite flowers.


From the top in this picture we have marigold, forget me not, daisy, aster, poppy, sweet pea and pansy. I will probably start making some more once the spring and then summer flowers are all in force, I might not be able to stop!


These coasters were hooked using Stylecraft Classique Cotton DK an are really quick and easy to make, Being cotton too makes them washable which is perfect for the inevitable tea stains! I have shared the pattern for free here on my blog, if anyone fancies hooking them maybe you could try you own colour combinations and share them with me on my facebook page www.facebook.com/lovedottycrochet
Happy hooking!
Kelly@Lovedotty

Pattern - Flower Coasters


Pattern in UK Terminology

Hook - 3.5mm

Yarn - Cotton DK Weight (I used Stylecraft Cotton DK Classique)

Three different colour yarns, we will refer to those as yarn A, B and C.


With yarn A make a magic ring and work first round into ring (alternatively you can make 2 chains and then work into the 2nd chain)

Round 1 - Ch3 (counts as 1tr st throughout ), 13tr, join with a ss into third ch of first st (14 sts)

Round 2 - Ch3, 1tr into same st, 2tr in each st to end, join with a ss in third ch of first st (28 sts)

Change to yarn B

Round 3 - Ch1 (do not count as a st throughout), 1dc in same place, *ch2, skip 1 st, 1dc in next st*, repeat from * 12 times, ch2, join with ss into top of first dc (14 sts, 14 sps)

Fasten off yarn B and join yarn C in any ch2 sp.

Round 4 - Ch3, 2tr in same sp, *ch1, 3tr in next ch-2 sp, repeat from * 12 times, ch1, ss in 3rd ch of first st (42 sts, 14 sps)

Round 5 - Ss into next st (2nd tr of first 3 st cluster of previous round), ch1, *1dc, 5tr into next ch-1 sp*, repeat from * 13 times, ss into first dc (84 sts)

Fasten off and weave in ends


You can chose to block the finished coaster, however they should be fine without.


You can have so much fun finding different colour combinations for this pattern. Please see my blog for some of my flower themes ideas. I would love to see your combo's, please tag me on Instagram @lovedottycrochet

Happy Hooking!
Kelly @lovedotty


© All images belong to Kelly of lovedotty unless otherwise stated. Please link to pictures, content or DIY's if used on your own website. Crochet patterns are written by Kelly of lovedotty unless otherwise stated, please link to original post if used on your own website. Feel free to sell the finished product that has been created from the pattern, if sold via a website, please link to lovedotty blogspot. However please do not publish patterns in full or as your own, unless agreed by Kelly.

Sunday, 12 April 2015

For Sale!

I am so excited to announce that my crochet pieces are now being sold in a shop in Norwich!
I have my very own little shelf in the Norwich Gift Emporium which, for anyone who would like to pop along is in Lower Goat Lane (next to Beaujangles).
I have always wanted to sell my pieces commercially but always something I held back from, after all it is pretty scary putting your designs out there. But then I thought 'what the heck' and I have already sold some stuff!
Items for sale will be my lovely coasters which I have documented on here before (designs by myself, using cotton DK yarn - pattern for the cupcake coasters still available for free here on my blog)

Next I whipped up some of these lovely daisy pin cushions (pattern by Nikki Trench, using cotton DK yarn)
As we have just had Easter, I also added these little egg cosies (pattern by Nikki Trench, using Stylecraft Special DK)
I also had these lovely strawberry necklaces on a long chain (pattern for strawberry by Maki Oomachi, using Sirdir Calico DK and design by lovedotty) which you will see in the main picture (didn't take a separate picture, doh!)

I probably haven't mentioned this but before lovedotty, I had spent 10 years making and selling jewellery at craft fairs under the guise Butterfly Blue! I did and do still love designing and making jewellery but there is so many jewellery makers out there it got harder and harder to stand out from the crowd.
I have never been one for simplicity so was always striving for something unique that I could say I have designed myself. This is why I love crochet so much, give me a hook, yarn and an idea and you can create something so unique and 'yours'.
Anyway there are still a few jewellery pieces in my collection that I had designed that I was so proud of and hadn't seen anywhere else and these were my picture rings, bangles an necklaces, so I have added these to my shelf always. Kinda looking forward now to digging my jewellery tools out to make some more!


I hope you wish me luck with this new venture!
Happy hooking
Kelly @ lovedotty

Tuesday, 10 March 2015

Shop Opened

Hiya, I'm really excited to have 'finally' stocked my shop on Etsy with some of my crochet goods. On there at the moment are my crochet coasters which I have mentioned before. Made in lovely 100% cotton so they are machine washable (see I've thought of everything!)
You will find the pattern for the cupcake coaster for free here on my blog.
More items to follow, watch this space for updates!
Happy hooking!
Kelly@lovedotty

Wednesday, 11 February 2015

Crochet Coaster Crazy

Hiya, one of my new years resolutions was to display at more craft fairs this year so with this in mind I have been thinking of crochet goods I could make and sell. They would need to be fairly easy and quick to hook, practical and look fabulous! This brought me to coasters!
I made a few batches of coasters for Christmas presents last year in a lovely leaf design which I found in Inside Crochet magazine. 

They were really enjoyable to make so I have whipped up some more batches for my stock. I thought a cotton yarn would be best to use as it is washable and looks so neat and tidy. I plumped for Stylecraft Cotton DK Classique (my new addiction)

Whilst crocheting these I had loads of ideas whizzing around in my brain as to what I could design myself, an occupational hazard of a crafter! Being a bit girly and loving all things vintage, I adapted some of the stitches I used in the leaf coaster to make a round, vintage doily type coaster. Just the right size to fit a teacup and saucer on for afternoon tea! 

I used Stylecraft cotton again, I love the feel of this yarn when I crochet!

Next up was something more fun, I thought what goes lovely with a cup of tea? Cupcakes of course, so I designed these lovely pastelly cupcake coasters, again using Stylecraft cotton. 

I absolutely love them, so much so I thought I would share the pattern here on my blog!

All coasters will be available to buy from any craft fairs I attend (although I haven't booked any yet!) and hopefully via Etsy in the Spring.

Happy hooking!
Kelly@lovedotty

Pattern - Cupcake Coasters


Pattern in UK Terminology

Hook - 3.5mm

Yarn - Cotton DK Weight 
(I used Stylecraft Cotton DK Classique)

(Note - slip stiches do not count as a stitch)


Using a bright colour make 20 chain
Row 1 - 1 tr in 4th ch from hook and in each ch till end, turn (17 sts)

Row 2 - 3 ch (counted as 1 tr throughout pattern), 1 tr into first st and each st till end, turn (18 sts)

Rows 3 to 5 - Repeat row 2 (21 sts)

Change to cream coloured yarn

Row 6 - 1 ch (does not count as st), 1 dc each st till end, turn (21 sts)

Row 7 - sl st in first st, *skip 1 st, 5 tr in next st, skip 1 st, 1 dc in next st, repeat from * to * 3 times, skip 1 st, 5 tr in next st, skip 1 st, sl st in last st, turn (29 sts)

Row 8 - sl st in first 3 sts (first 3 sts of previous 5 tr), skip next 2 sts, 5 tr in next st (dc of previous round), *skip 2 sts, 1 dc in next st, skip 2 sts, 5 tr in next st* repeat from * to * 2 times, skip 2 sts, sl st in next st, turn (23 sts)

Row 9 - sl st in first 3 sts, skip next 2 sts, 5 tr in next st, *skip 2 sts, 1 dc in next st, skip 2 sts, 5 tr in next st* repeat from * to * 1 more time, skip 2 sts, sl st in next st, turn (17 sts)

Row 10 - sl st in first 3 sts, skip next 2 sts, 5 tr in next st, skip 2 sts, 1 dc in next st, skip 2 sts, 5 tr in next st, skip 2 sts, sl st in next st, (11 sts)

Fasten off yarn and turn

Join red yarn in top of the 4th tr in the first 5 tr cluster

Row 11 - 2 ch, work a tr6tog (see definition below if required) as follows - 1 in same st as 2 ch, 1 in next st, 2 in next st (dc from previous round), 1 in next st and 1 in next st (should be 2nd tr of second 5 tr cluster from previous round), 3 ch and join with a sl at in same st, turn

Row 12 - 8 tr into top of tr6tog from previous round, sl st into 8th st from round 10 (2nd tr of 2nd 5 tr cluster) (8 sts)

Fasten off and weave in ends


Stitch definition - tr6tog - Treble  6 Together (working 6 tr sts together to make 1 st)
Yarn over hook, hook into stitch, yarn over hook, draw hook back through the stitch (3 loops on hook), yarn over hook, pull yarn through first 2 loops, yarn over hook, hook into next stitch, yarn over hook, draw hook back through the stitch (4 loops on hook), pull yarn through first 2 loops, repeat a further 4 times,  pull yarn through remaining 7 loops on hook

© All images belong to Kelly of lovedotty unless otherwise stated. Please link to pictures, content or DIY's if used on your own website. Crochet patterns are written by Kelly of lovedotty unless otherwise stated, please link to original post if used on your own website. Feel free to sell the finished product that has been created from the pattern, if sold via a website, please link to lovedotty.blogspot.co.uk. Please do not publish patterns in full or as your own, unless agreed by Kelly.